Table of Contents
Step 1 – Installing the Components from the Ubuntu Repositories
1. Update the package list in given below
sudo apt update
This command updates the list of available packages and their versions, but it does not install or upgrade any packages.
2. Install required packages
sudo apt install python3-pip python3-dev build-essential libssl-dev libffi-dev python3-setuptools
Step 2 – Creating a Python Virtual Environment
1. installing the pythin3-venv package will install the venv module by using below command
sudo apt install python3-venv
This package allows you to create isolated Python environments.
2. Make a parent directory for our Flask project
root@root:~# mkdir ~/example
root@root:~# cd ~/example/
root@root:~/example#
3. Create virtual environment to store your Flask project’s Python requirements
python3 -m venv exampleenv
This command creates a virtual environment named exampleenv in the example directory.
4. Before installing applications you must activate the virtual environment Use this command for activation.
source exampleenv/bin/activate
The source command activates the virtual environment, modifying your shell’s environment so that commands like python and pip will use the virtual environment.
prompt will change to indicate then you are in virtual environment it will look like this
(exampleenv) root@root:~/example#
Step 3 – Setting Up a Flask Application
you are in your virtual environment, you can install Flask and Gunicorn and get started on designing your application in here.
1. Install wheel with the local instance of pip to ensure that our packages
pip install wheel
2. Install Flask and Gunicorn
pip install gunicorn flask
Flask: A lightweight web framework for Python.
Gunicorn: A Python WSGI HTTP server that runs Flask applications.
3. Creating a Sample App
nano ~/example/example.py
Use the nano text editor to create a Python file named example.py and add the following code from flask import Flask
app = Flask(__name__)
@app.route("/")
def hello():
return "Hello There!
"
if __name__ == "__main__":
app.run(host='0.0.0.0')
The above configuration save and exit. This is a simple Flask app that returns “Hello There!” in blue text when accessed.
4. You are followed the initial server setup guide, you should have a UFW firewall enabled. To test the application you need to allow access to port 5000 in ufw
sudo ufw allow 5000
5. Test the Flask application
python example.py
WARNING: This is a development server. Do not use it in a production deployment.
Use a production WSGI server instead.
* Debug mode: off
* Running on https://0.0.0.0:5000/ (Press CTRL+C to quit)
This runs the Flask app, making it accessible at http://your_server_ip:5000.
Should see something like this
CTRL-C in your terminal window to stop the Flask development server.
5. Creating the WSGI Entry Point
create a file that will serve as the entry point in our Application.This will tell our Gunicorn server how to interact with the application. Create wsgi.py file inside of Project Directory
nano ~/example/wsgi.py
Add the following content.
from example import app
if __name__ == “__main__”:
app.run()
This file serves as the entry point for the Gunicorn server.
Save and close the above file. (from example import app) example is our flask Application Name.
Step 4 – Configuring Gunicorn
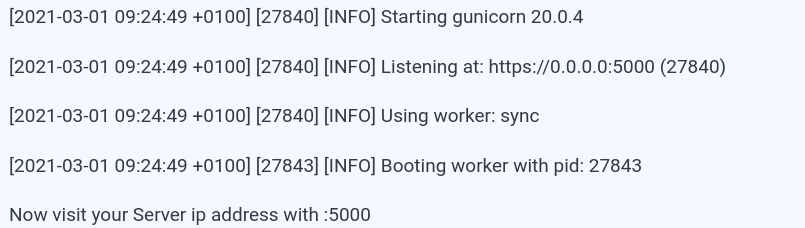
Our Application is now written with an entry point established. Now we can configuring Gunicorn. Before moving we check our Gunicorn can serve the application correctly or not. simply passing it the name of our entry point. In our case wsgi:app
gunicorn –bind 0.0.0.0:5000 wsgi:app
See Output like this
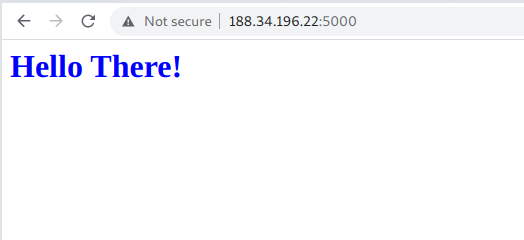
Eg : https://your_server_ip:5000 in our case our server ip address is https://188.34.196.22:5000
You can see the Application output

We are confirmed that it’s functioning properly . CTRL + C To terminate the Terminal Window.
Deactivate our Virtual Environment Using Following Command :
deactivate

Python command will use the System’s Python environment again
Create systemd service
create the systemd service unit file.automatically start Gunicorn and serve the Flask application whenever the server boots. Create .service files with the /etc/systemd/system Directory.
nano /etc/systemd/system
Example content of the service file is given below.
[Unit]
Description=Gunicorn instance example
After=network.target
[Service]
User=root
Group=www-data
WorkingDirectory=/root/example
Environment="PATH=/root/example/exampleenv/bin"
ExecStart=/root/example/exampleenv/bin/gunicorn --workers 3 --bind unix:/tmp/example.sock -m 007 wsgi:app
[Install]
WantedBy=multi-user.target
Save and close the above file. Reload the systemd daemon with systemctl daemon-reload.
Start and enable the service with using below commands
systemctl start example.service
systemctl status example.service
Step 5 Configuring Nginx to Proxy Requests
Gunicorn application server should now be up and running Fine. Now configure Nginx to pass web requests to that socket.creating a new server block configuration file in Nginx’s site-available directory.
install nginx package using Following Command
sudo apt-get install nginx
Create a server block configuration file in /etc/nginx/sites-available, e.g., example
server {
    listen 80;
    server_name avi3.examplehosting.com www.avi3.examplehosting.com;
    location / {
        include proxy_params;
        proxy_pass http://unix:/tmp/example.sock;
    }
}
Enable the Nginx configuration with.
ln -s /etc/nginx/sites-available/example /etc/nginx/sites-enabled
you can test for syntax errors – using Following command
nginx -t
There is no syntax Error showing.Then restart nginx process using following command
sudo systemctl restart nginx
We don’t need access through port 5000. Now we are removing that rule using following command
sudo ufw delete allow 5000
sudo ufw allow ‘Nginx Full’
now be able to navigate to your server’s domain name in your web browser.should see your application’s output

Step 6 – Securing the Application
let’s get an SSL certificate for your domain. Secure The Application using Let’s Encrypt Certificate Using. Install Certbot’s Nginx package using apt Package
sudo apt install python3-certbot-nginx
Certbot provides a variety of ways to obtain SSL certificates through plugins. To use the plugin using following command.
Certbot with the –nginx plugin, using -d to specify the Domain name
If you run this command First Time it will be prompted to enter an email address and agree to the terms of service. Certbot will communicate with the Let’s Encrypt server
sudo certbot –nginx -d avi3.examplehosting.com
Choose to redirect all HTTP traffic to HTTPS. Verify your SSL setup by visiting your domain via HTTPS.
Remember to renew your SSL certificates as needed using certbot renew. Regularly check your setup using tools like SSL Labs.
verify the configuration, navigate to your domain, using https://

TRENDING OFFER