Table of Contents
Introduction
Encountering the “413 Request Entity Too Large” error in WordPress can be frustrating, especially when you’re trying to upload a large file or install a new theme or plugin. This error occurs when the server is configured with a limit on the size of files that can be uploaded, and your file exceeds this limit. Fortunately, you can solve the same issue through different ways, they are:-
Fixing “413 Request Entity Too Large” Errors
For Apache Servers
A) Modify the .htaccess File
- Access your website’s root directory via FTP or your hosting control panel’s file manager.
- Locate and edit the .htaccess file.
- To increase the upload limit you can add the below given lines :
- php_value upload_max_filesize 64M
- php_value post_max_size 64M
- php_value max_execution_time 30
- php_value max_input_time 300
- Now you can save and update “.htaccess” file back to the server.
B) Update the php.ini File
- Firstly, you can go to your website’s root directory via FTP otherwise use the hosting provider control panel.
- Locate or create a php.ini file.
- Add or update the following settings
- upload_max_filesize = 64M
- post_max_size = 64M
- max_execution_time = 300
- Save and upload the php.ini file to your server.
For Nginx Servers
A) Modify the Nginx Configuration
- Access your server’s Nginx configuration file, typically located at /etc/nginx/nginx.conf or /etc/nginx/conf.d/.
- Add or update the following directive within the http, server, or location block:
client_max_body_size 64M;
- Finally, you can save the file and restart Nginx for changes come into effect.
sudo systemctl restart nginx
By Editing Your Functions.PHP File
You can also boost the maximum file upload size in WordPress by modifying the `functions.php` file of your active theme. Keep in mind that this adjustment will revert to the default settings if you change themes, so it’s a good idea to back up your file before making any changes.
Through this way, you can change the max file upload size using modifying the functions.php file, follow these steps
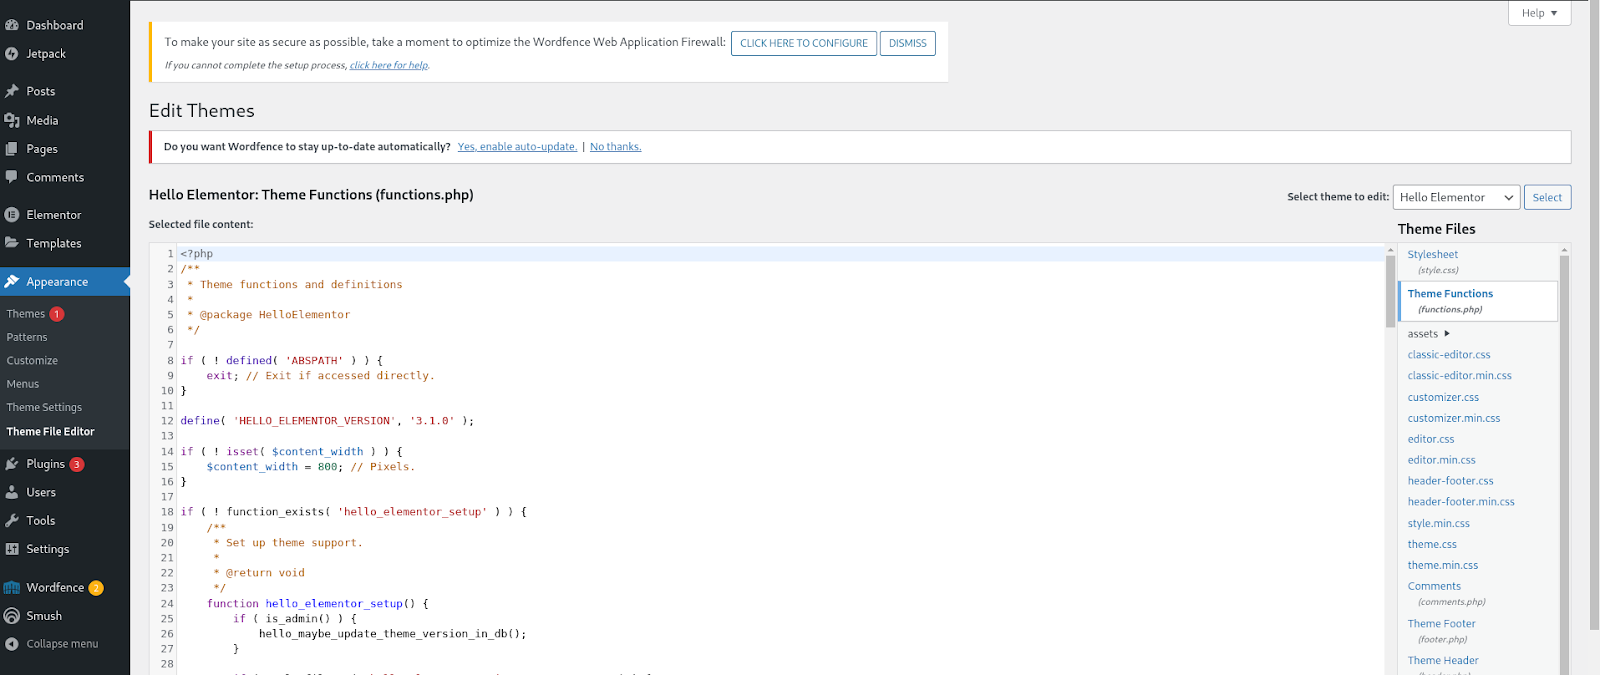
Open WordPress dashboard, then you can navigate to Appearance (option from the left menu)-> Theme Editor
Open the theme functions file ‘functions.php’ and add the following code one by one to the file. Once you are done, save it.
- @ini_set( ‘upload_max_size’ , ’74M’ );
- @ini_set( ‘post_max_size’, ’74M’);
- @ini_set( ‘max_execution_time’, ‘400’ );
By following these steps, you can adjust the file upload size limit on your web server and prevent the “413 Request Entity Too Large” error. Whether you are using Apache, Nginx, or IIS, you can configure your server to allow larger file uploads, ensuring smoother operation of your website.
Conclusion
By following these steps, you can adjust the file upload size limit on your web server and prevent the “413 Request Entity Too Large” error. Whether you are using Apache, Nginx, or IIS, you can configure your server to allow larger file uploads, ensuring smoother operation of your website.
TRENDING OFFER